Monday, February 24, 2014

Big Daddy Boots and Tank


Big Daddy has a few accessories. The tank, shoes, knee guards, metal weights for the shoes, and a few bolted metal ring accents on the arms and legs.

The tank isn't too hard. Here's what you'll need:

An 10" diameter cement column form: $10 from Home Depot


1" MC foam strips x 2: free from a friend.


A 1" thick Styrofoam circle (about 12" diameter): cut from free scraps from the furniture store
 A friz-bee: $1 at the dollar store


A 5" Styrofoam circle: $1 at the dollar store


5" bolt and nut x 3: $1 from Home Depot


2 Metal mounting strips (about 8" long): $2 at Home Depot

Masking Tape
Hot Glue

And a piece of Styrofoam for the end cap: cut from free scraps from the furniture store


First, I cut the concrete column form to 24" tall. Then, I covered the exposed Styrofoam with masking tape and put 2 strips of MC foam around the tank for decor.


Next, I hot glued on about two dozen little hex bolts I'd cut out of MC foam on the foam strips.

We used two long bolts to mount the tank to the suit. On the inside of the tank, we glued one of the metal mounting strips/brackets, then inserted the bolts through it and hot glued them all in place. The other metal mounting strip goes inside of the suit. We drilled holes for the two long bolts through the back of the suit. To attach the tank, we simply inserted the bolts, then screwed the nuts on from the inside of the suit.

 After attaching the valve handle to the tank lid with a long bolt, I hot glued the tank lid and the end cap to the concrete column form.


Now lets move on to the shoes!

For the shoes you will need:

2 Big blocks of Styrofoam: free from the furniture store.


 A pair of old shoes: couple bucks at the thrift store (Use a pair of shoes or boots that cover your whole foot, but that you can slip your foot in and out of fairly easily.)


1/2 Sheet of Foam Core Board: dollar store


1 can of Insulation Foam:


Duct Tape:

Masking Tape:


Cardboard:

And your trusty electric turkey carver:


First we cut out a few pieces of Styrofoam around the shoe to create the sides and back of the boot.

Note: Our shoe had about 6" of lift and and extra 3" on both the front and back.


Next, we shaved the Styrofoam down to the general shape of our Big Daddy boot and curved the bottom front of the shoe to make it easier to walk in.

Using that shape, we cut the shoe souls out of cardboard and hot glued them to the bottom. Then, we tape/glued/secured the shoe to the Styrofoam keeping it centered.

Note: We put a piece of foam core board in between the shoe and the Styrofoam because we were afraid with it's uneven surface, the shoe wouldn't glue to the Styrofoam very well. But it probably wasn't necessary. You'll see why later.


Then, we hot glued on our extra side and back pieces of Styrofoam.


We filled in the whole top of the boot with expanding insulation foam. (This makes it very secure.)


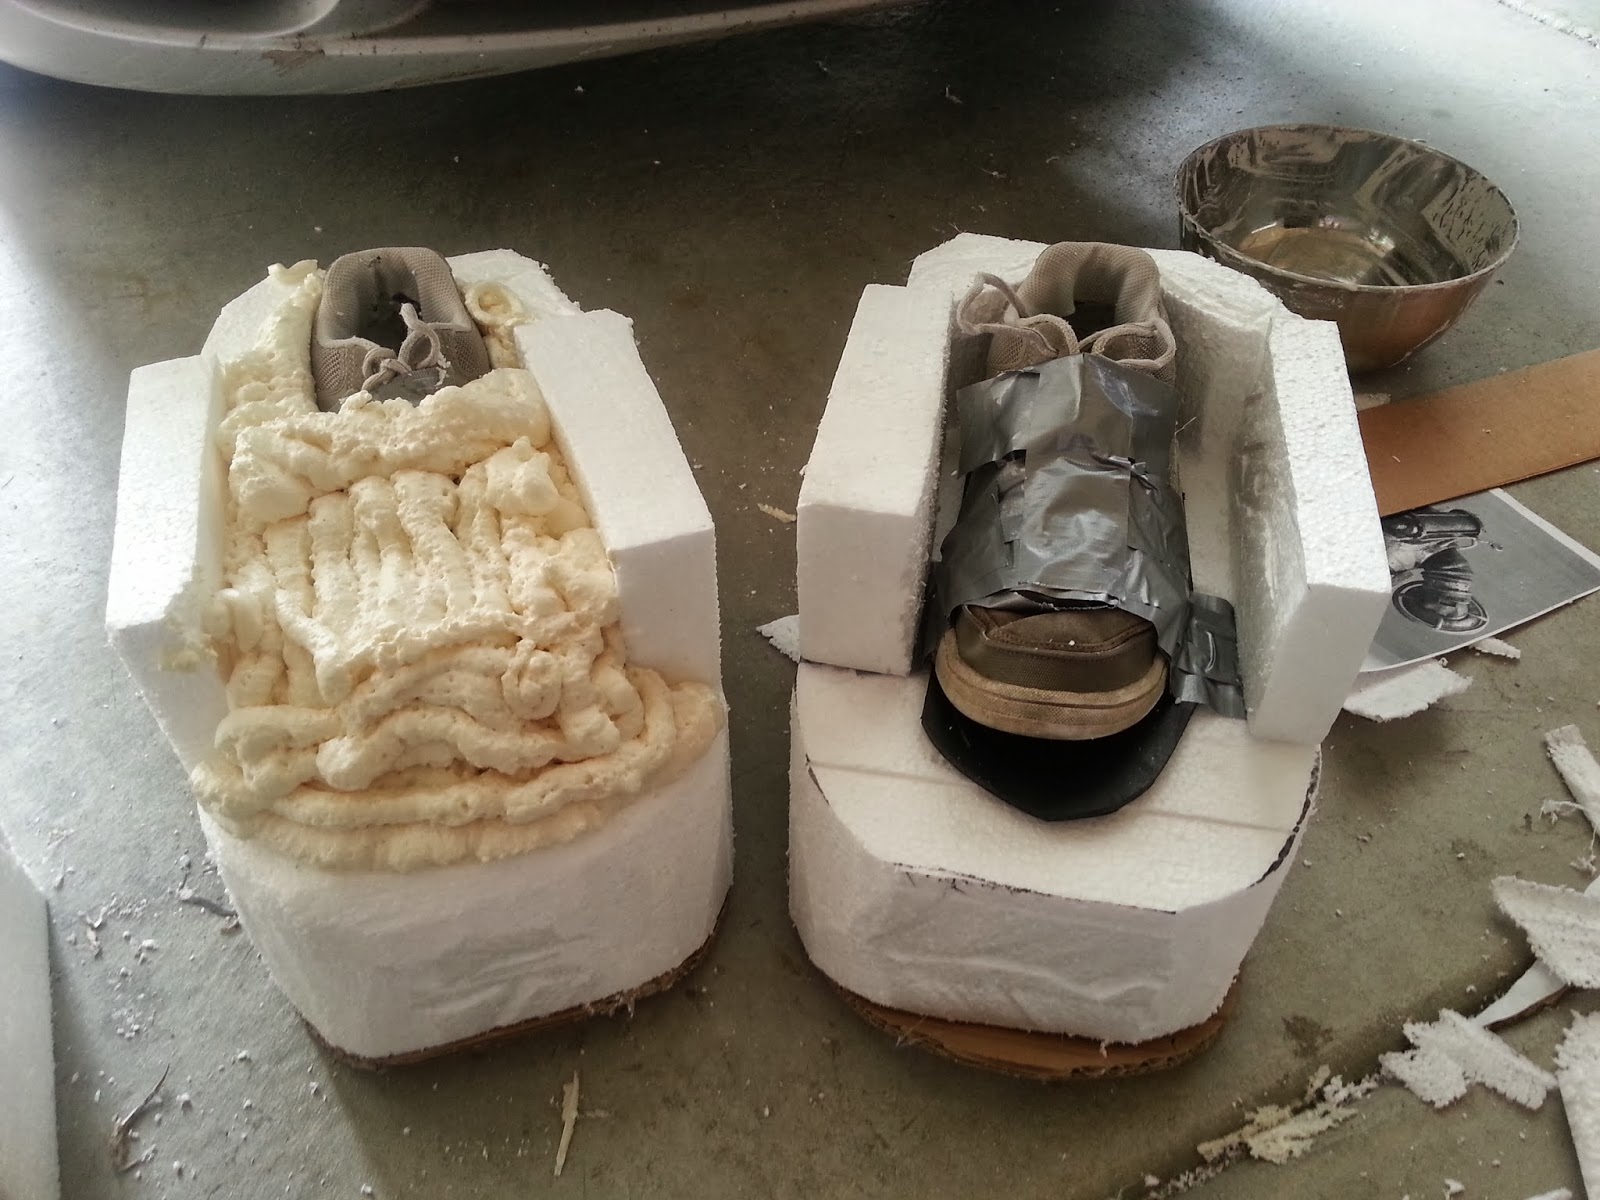
Once the foam set, we carved them down to our desired boot shape and tested them out. 


We covered the bottom of the shoe (the cardboard footprint) in duct tape, and covered all the rest of the exposed Styrofoam in masking tape.


I then added a strip of MC foam around the bottom (covering the duct tape ends) and put another strip of MC foam over the top. Once more, I hot glued on a bunch of those MC foam bolt heads for flavor.


Big Daddy has some weights on his boots too! I cut a couple of these out of Styrofoam scraps and covered them with masking tape.


Now the boots are ready for paint (which we'll cover later).

In the next chapter, I'll tell you how to make the arm and leg accent rings! Stay tuned!


Saturday, September 21, 2013

Big Daddy's Arms

BIG DADDY'S ARMS

Looking at the suit, Chris' elbow landed where the Big Daddy's shoulder would be. We needed to make a forearm extension so the Big Daddy wouldn't look like he had stubby arms... or no elbow.


Here's how we did it.

The Drill Arm:

What you need: 

4 sheets of heavy duty poster board - Walmart, $1.00 each


4 Big Chunks of Styrofoam ( aprox. 18" x 12" x 6") - Free from the Furniture Store (They have a ton that comes in with furniture shipments as padding.)


10' length of 4" PVC Pipe - Home Depot, $12.00
10' length of 1" PVC Pipe - Home Depot, $3.00


4" PVC elbow - Home Depot $3.00


 PVC Cement - Home Depot, $4.00


Gray Spray Paint - Walmart, $3.50

2 sheet Foam Core Board - Dollar Store, $1.00

Hole Drill Bit Kit (Includes 1" and 4" hole drill bits) - Harbor Freight, $12.00


1 roll 2" Masking Tape - Walmart, $2.00
1 roll 1" Masking Tape - Walmart, $1.50

Drill


Poly Tubing

Hot Glue

Construction:

First, tape a sheet of heavy duty poster board into a cone shape. The tip is the corner of the poster board. Cut a section out of another piece of board to fill in the bottom. Trim the edges so it sits flat.


Cut a large circle of foam board or Syrofoam and insert it in the wide end of the cone to make sure it keeps its shape during the next few steps.

Cover the cone in a layer of fiberglass cloth and resin. (You could put it on the inside or the outside)
After it dries, cover the cone in a layer of paper mache.
Then another layer of cloth and resin.
And again, once its dry, add one final layer of paper mache.

(Sorry, didn't get pics of these last steps--but you get the idea.)

For the blade, cut 1/2 to 1/3 round sized sections of two-layer-thick poster board, measuring and trimming them against the cone as you go. Use masking tape to attach them to the cone. Start with 2-1/2" to 3" wide blade segments. You'll trim it down once all the pieces are on.


Trim the blade down to 2" and cover completely with masking tape. (If you use 2" tape on your 2" blade, it'll go pretty quick). Put a line of hot glue at the base of the blade where it touches the cone to secure it.


Cut two 12" lengths of 4" PVC pipe and use the pipe cement to secure them to each side of the elbow. (We added duct tape, but that probably wasn't necessary.)

Cut a 1" hole through the middle of the elbow and insert a 5" long piece of 1" PVC pipe through for your hand grip. Cement or hot glue in place.


Note: We cut out as much of the PVC as we could to make the arm lighter, but Chris could still only wear the suit for about thirty minutes before his arms started getting sore. Looking back, we should have looked for something lighter than PVC.

Cut out a Styrofoam circle that will fit snugly in the end of the drill (the plug). Cut a 4" hole in the center of the plug (for your PVC arm to fit through).


Hot glue the Styrofoam plug into the end of the drill cone.
Cut another circle of Styrofoam for the rounded cap on the drill. Cut out a 4" hole. Cover in masking tape and glue it to the top of the drill plug.

Next, insert the PVC arm through the Styrofoam plug and cap. Make sure it fits snugly, and hot glue it in place.


Measure and cut a length of poly tubing to go around the base of the drill. Glue the ends together to make a circle. Cut 4 small connector pieces (aprox. 2" each) of poly tubing for the brackets. Drill out four 1/2" holes on the sides of the foam cap. Insert and glue the 4 small poly tube pieces. Put on the poly ring on over the connector pieces and glue in place.

Note: I inserted and glued a small piece of an old foam brush handle into the joint of the poly tubing ring to help make it stronger and straighter.


Add a band of MC foam to cover the seam and a few MC foam bolts for accent.


The Big Hand:

What you need:

Deerskin or Pigskin leather - Thrift Store, $5.00 (Cut up a thrift store jacket or skirt.)


14 Gauge Galvanized Wire - Home Depot, $7.00 (or a couple hangers for free)


4" PVC Pipe
1" PVC Pipe
PVC Pipe Cement

Construction:

Start with a pattern, but make it 2 to 3 times larger than a normal glove.


I made mine out of thin leather scraps--thin enough so my sewing machine could stitch through it. I put my hand in the image for size comparison.


Next, make a hand frame out of wire:


Put the frame in the glove so you can mold it. Stuff the glove with newspaper to give it some substance.

Next, you'll make the arm. Do it same as the other arm: 2 pieces of 4" PVC, 1 joint, 1 hand grip in the middle.


Attach the stuffed glove to the end of the arm, and you're set.

Note: We used duct tape, but only because we were pressed for time. You could probably use hot glue or masking tape or something that won't leave as much residue on the leather.